

Something Different - Needle Felting
Sunday, December 03, 2006
 Earlier this year, I took a class in needle felting. I didn't know anything about the process, but I had seen some of the teacher's work in a local art show and asked her to contact me the next time she taught a class. The pieces she had in the show were sculptural, fanciful, colorful mermaids and other figures. At that time, I thought it would be great to figure out how to make some small animal sculptures for Christmas ornaments. I took the class sometime before Valentine's day, so our felting subject was a heart. It's a very simple technique, but the results are unique and limited only by one's imagination. I hadn't done any more felting until about a week ago when I decided it was time to make some ornaments to sell at the Auburn Old Town Gallery.
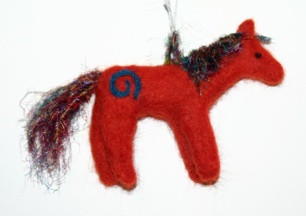
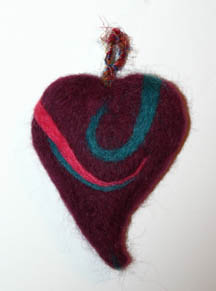
Even though it's a simple process, it's time consuming, so I've only finished a heart and a little pony, but I'm pleased with the results. If I can eke out a bit more time, I'll make a couple more hearts (much less complex to do than the pony). So, I'm showing off my two latest pieces: the heart is different on each side, so I've included a front & back photo; for the pony, I used woven multi-colored silk thread for the mane & tail. I also used the same thread for the hanger on both pieces.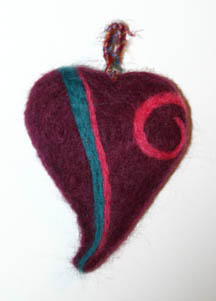
 I suppose you'd like to know a bit more about the technique, so I'll try to explain the basics. . .
Everything is made from wool with the core of the piece made from a beige wool batting. Once the core has been shaped, then colored wools are wrapped around it. The colored wools are are softer and silkier than the batting and are called roving. A needle (or a few needles in a special holder) are used to "felt" the wool batting core by stabbing it with the needle. The needle has a barbed end that snags onto the wool fibers and tangles them together. As you keep working the wool with the needle, it becomes firmer and firmer. At first the core is a flat pad, but then you add more and more wool to it, continuing to work it with the needle to build up the desired shape. When the core shape is ready, then you wrap it with thin sheets of the colored wool roving and stab it with the needle to make it adhere to the core. Continue to add the colored roving around the core until the core no longer shows through. Where I used the silk thread on my pieces, I used the needle to stab the ends of the thread down into the core to anchor them. There are a number of places on the internet where you can order supplies and books for felting. I ordered my supplies from Weir Dolls & Crafts.


0 comments:
Post a Comment