My First ACEO

Sunday, December 31, 2006


If you've ever spent time browsing eBay for art, you've probably come across the term "ACEO" - it stands for Art Cards, Editions & Originals. ACEO's are affordable mini artworks that are the exact size of a baseball trading card (2.5" x 3.5") and are a great way to collect art. ACEO's may be matted, framed, traded, given as a gift within a greeting card, etc.

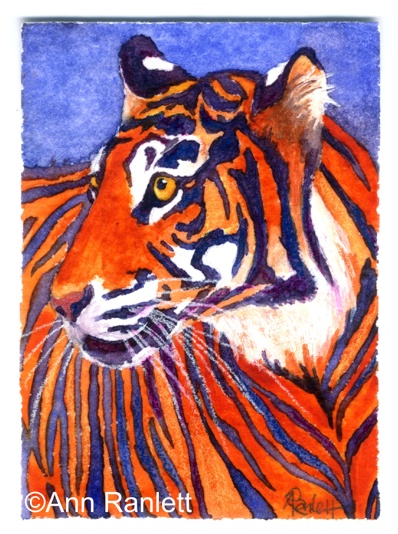
I've wanted to try my hand at these mini works of art since I first joined some eBay artist groups earlier this year. Finally found a little time and a reason to do one today! One of the eBay groups of which I'm a member is the Professional Animal Artists Online (PAAO) and they have a "theme week" on the last Friday of each month (items can be listed on Friday, Saturday or Sunday to be included in the theme week). This month's theme is the letter "T". The idea is that if we band together and list items with the same theme, our work might get noticed amongst the bajillion other items on eBay! Since the theme was "T", I painted this tiger. I titled the piece "Tyger, Tyger" after the poem "The Tyger" by William Blake. Google "the Tyger" and you'll find the poem. Click here to see my listings for the PAAO theme week.

I certainly plan to create more ACEO's - it'll be fun to have a whole collection of 'em, and I hope they'll find their way into someone else's collection!

It's been a busy month - I'll post a couple of the portraits I recently finished and some info about upcoming events in a few days.

I hope you had a wonderful Christmas/Holiday season and best wishes for a happy, prosperous and peaceful 2007!!

Read more...

Just Finished - Portrait of Bentley the Shetland Sheepdog

Friday, December 08, 2006

Bentley's portrait The medium is ink (pen & ink and ink washes) on scratchboard; the drawing measures 8"x10". I used EssDee professional scraperboard (aka scratchboard) and Koh-i-noor Ultradraw ink. I always use the Koh-i-noor ink, but this was the first time I'd used the "pro" scraperboard. I usually use either EssDee commercial grade scraper board or Paris scratchboard. The pro stuff is on a thicker board with a thicker surface (that's the scratch-able part). It's also textured - the commercial and Paris boards are smooth. I'd purchased it to use for drawings that require a lot of scratching - to give me more surface for re-working. This portrait did not require a lot of scratching (no more than a typical portrait of this style) but I hadn't tried the pro board yet. It worked fine and I'd use it again. It's more expensive than the other 2 types, so I'll reserve it for projects that really need it.

color reference photo greyscale reference photo Bentley's portrait: Stage 1 I've included the photos and the 2nd image to give you a bit of an idea about the process. (To learn even more about my scratchboard process, visit this page of my website.) I use a color photo and a greyscale version of the same image for reference. The grey version helps me see the tones and shades, but it's handy to have the color version to figure out details that might not be as obvious in the grey photo. The 2nd image shows my "value study" which I've painted directly on the scratchboard surface. It's chunky and rough - the tones aren't blended yet - but it provides my road map. By the time the portrait is finished, most of the ink that I laid down in this initial phase will have been scratched off! As I continue working, I refine and define the tones and textures by scratching the surface and then re-inking over the scratches (repeating as needed).

Bentley's a handsome, sweet guy and he was very obliging when I took his photos for the portrait. I remember we (his parents and I) kept telling him what a good boy he was even though we all knew he was deaf! I think he got the idea anyway. I'm pleased to report that his parents think the portrait is "stunning".

Read more...

Something Different - Needle Felting

Sunday, December 03, 2006

Felt Pony by Ann RanlettEarlier this year, I took a class in needle felting. I didn't know anything about the process, but I had seen some of the teacher's work in a local art show and asked her to contact me the next time she taught a class. The pieces she had in the show were sculptural, fanciful, colorful mermaids and other figures. At that time, I thought it would be great to figure out how to make some small animal sculptures for Christmas ornaments. I took the class sometime before Valentine's day, so our felting subject was a heart. It's a very simple technique, but the results are unique and limited only by one's imagination. I hadn't done any more felting until about a week ago when I decided it was time to make some ornaments to sell at the Auburn Old Town Gallery.

Even though it's a simple process, it's time consuming, so I've only finished a heart and a little pony, but I'm pleased with the results. If I can eke out a bit more time, I'll make a couple more hearts (much less complex to do than the pony). So, I'm showing off my two latest pieces: the heart is different on each side, so I've included a front & back photo; for the pony, I used woven multi-colored silk thread for the mane & tail. I also used the same thread for the hanger on both pieces.
Felt Heart (side 1) by Ann RanlettFelt Heart (side 2) by Ann Ranlett I suppose you'd like to know a bit more about the technique, so I'll try to explain the basics. . .
Everything is made from wool with the core of the piece made from a beige wool batting. Once the core has been shaped, then colored wools are wrapped around it. The colored wools are are softer and silkier than the batting and are called roving. A needle (or a few needles in a special holder) are used to "felt" the wool batting core by stabbing it with the needle. The needle has a barbed end that snags onto the wool fibers and tangles them together. As you keep working the wool with the needle, it becomes firmer and firmer. At first the core is a flat pad, but then you add more and more wool to it, continuing to work it with the needle to build up the desired shape. When the core shape is ready, then you wrap it with thin sheets of the colored wool roving and stab it with the needle to make it adhere to the core. Continue to add the colored roving around the core until the core no longer shows through. Where I used the silk thread on my pieces, I used the needle to stab the ends of the thread down into the core to anchor them. There are a number of places on the internet where you can order supplies and books for felting. I ordered my supplies from Weir Dolls & Crafts.

Read more...

Greyhounds!

Monday, November 27, 2006

I visited a local greyhound rescue facility on Friday - an interesting experience (more about that later). It was a multi-purpose visit since I had a greyhound painting to deliver and the client who purchased it was going out to adopt a new greyhound - so we combined purposes and I met her at the rescue place. I'd known about the facility for a while and had wanted to get out there, so this worked out great.Freddie - reference photo
Blue Boy - the painting of FreddieThe painting is one I did over a year ago. The photo I used for the reference was one my client had taken of one of her ex-racing greyhounds (Freddie) - I'd filed it in my archives for future use. At the time I created the painting, I was working on my initial series of "Paintings with Petzazz" pieces and really liked Freddie's expression; so Freddie became "Blue Boy". At the time, there was no expectation that she should/would buy the painting, it was just something I wanted to do and I sent her a print and a magnet with the "Blue Boy" image. This year, however, she saw the painting again and she and her husband decided they wanted to buy it. Of course, I'm very happy that the painting now hangs in their home and Freddie's!!

I said the visit to the facility was "interesting" because it's typical of any animal rescue system in that it's great to get a chance to meet new animals and the folks who care so deeply about them, but it's extremely sad that the animals even need to be rescued in the first place. There were about 12 dogs there and I believe most of them had come from the same racing circuit in Arizona. Racing greyhounds lead difficult, unpleasant lives and when they're no longer of any use (either as racers or breeders), they are discarded. I won't go into further detail, but it's a terrible, inhumane situation. Greyhound rescue organizations around the country take in as many as they can, nurse them back to health, figure out their personalities & behavioral issues and endeavor to find permanent, loving homes for them. Even though they've lead rough lives, these rescued greyhounds make good pets; they have sweet, gentle personalities and have been described as "40 mile an hour couch potatoes". Of course, it takes a special person to adopt one and help them learn how to enjoy life, but the rescue folks are very experienced and adept at facilitating that transition. For more information about greyhound rescue and adoption, check out www.greyhounds.org and www.greyhoundfriendsforlife.org.

Read more...

Jack Russell Terrier Pup - New Drawing "Bliss"

Monday, November 20, 2006

Bliss - ink on scratchboard drawing Just finished "Bliss", an ink on scratchboard drawing of a napping Jack Russell terrier (JRT) pup. When I was looking for subject material to use as a demo for a scratchboard class I taught in May, I thought this image would be perfect. The original drawing is available - as soon as I get it framed, it'll be at the Auburn Old Town Gallery where I show my work. Click here for the drawing specs and price.

The reference photo is one I took a few years back at a JRT show in Dixon. I happened upon two girls sitting inside a portable pet fence with a litter of puppies. Each girl had a puppy wrapped up in her lap. Too cute to pass up! I didn't ask the pup's name, so I don't know much about it, but while I was working on the drawing I was referring to it as "she" and the title "Bliss" just came to me at some point during the drawing's progress. Drawings and paintings definitely do take on a life of their own and I get very connected to them while I'm working on them.

reference photo for BlissEven though the backgrounds of the photo and drawing are dark, I think you can see that I made some changes to the background of the drawing so it would read better. Oftentimes what's obvious in a photo doesn't translate well to the drawing, so I make adjustments. I pretty much stuck with the same shapes on the right side, but made some changes to the wrinkles of the fabric on the left side and removed the lettering. These complex backgrounds are time-consuming, but I really enjoy the challenge of creating texture with subtle shades of grey. For a demo of my scratchboard process, check out this page of my web site.

Read more...

Bernese Mountain Dog Portrait in Progress

Thursday, November 16, 2006

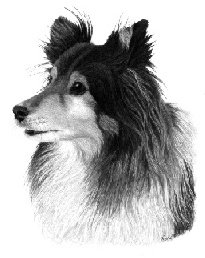
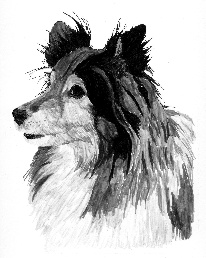
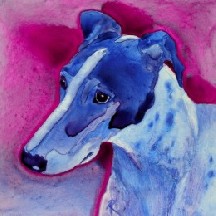
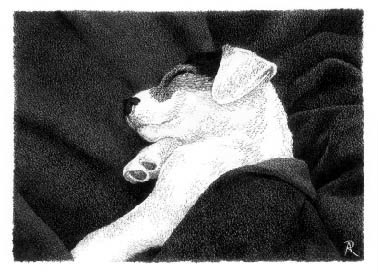
Today I worked on this portrait of Kassie, a very sweet Bernese Mountain Dog. This is the second Kassie portrait for me. A few years back, I did a scratchboard portrait of Kassie in a realistic style (below). The new portrait is in my "Paintings with Petzazz" interpretive style - bright vibrant colors with a limited palette painted in watercolor on Yupo (a synthetic paper). The color on the real portrait is a bit different than what you see here - I took a photo of it, and the lighting wasn't that great. I fought with the color correction for a while and then I said "to heck with it" and let it go, so you'll have to use your imagination a bit. The background is bright orange, but there's more variety of tone/color than what's showing here. The orangey-pink tones on her face are really a vibrant magenta. Most of the part that's white now will be various shades of purple and purple-blue. Her throat & chest are white, but I'm using shades of light purple for the shadows; she also has a white muzzle and a "blaze" running down from the top of her head (you can see all that in the realistic portrait). Even though the colors are a bit off, at least you can see Kassie's wonderful, happy personality! I'll post a better scan of the final portrait after I finish it later this month.

The realistic portrait was done in ink on scratchboard to the point where it was finished, but then I used a bit of watercolor to tint her caramel colored "points", tongue and eyes. The effect reminds me a bit of a hand-tinted black & white photo.

Read more...
- - - All art and images ©Ann Ranlett, unless otherwise credited. All rights reserved. - - -
_________________________________
"This site uses cookies from Google to deliver its services and analyze traffic. Your IP address and user-agent are shared with Google along with performance and security metrics to ensure quality of service, generate usage statistics, and to detect and address abuse."

___________________________

  © Free Blogger Templates Nightingale by Ourblogtemplates.com 2008

Back to TOP